Showing posts with label Product Design. Show all posts

Monday, September 30, 2013

QwikFlix: Scooter Bounce

I've been meaning to add a few of my old animations to the blog. It's just tedious to code and setup since it was created in Flash long ago. Since then, ActionScript has gone from 1.0 to 3.0 and it is quite a difference. Not only does the coding need updating, but in order to view the Flash file on Blogger . . . more coding must be added. But I'm slowly getting the hang of it. Even added a play again button so that the clip won't loop on and on forever.

This was a test animation from when I worked at a company called CSI, which was several years prior to the popular TV show making it's debut. (Yes, it was a hoot to tell people I worked at CSI . . . sigh.) I was developing the main cast, trying to give each a personality to play on for our project, SchoolKidsOnline. (That's Scooter in the top right of the image below.)


Scooter was going to be the nerd who enjoyed sports. While he didn't have the physical stamina like his other team players, he was a genius with probability, trajectory angles and other physics-related stuff. He was also smart enough to create robots like his basketball-bot and strike-less bat.

Note-
Android viewers will need to have their OS running Jellybean in order to play the Flash movie.


Friday, July 19, 2013

Product Design: Robot Basket

Few people asked me what I do for a living.
I'm a Creative Director under my own company name (Arrrggghhh Ink LLC) and I work exclusively for a company in China. I help design and create fabricated textile products, which is a fancy way to say I design toys, costumes, pet and novelty items.

I can not usually show my work online, because many items are exclusively made for major retail stores like Target, PetSmart and Wal-Mart. We would not be a leading company today if we didn't secure our designs from the general public (and our competitors.)


Attached is a design I did several years ago. It was a robot design for an Easter Basket. Usually I sketch out and color a design. I then add bits of detail information to help explain the look and materials for the prototype designers in China. The team in China are usually so talented, that there is rarely a time I need to do turn-arounds or sketch from another point of view for them to design a prototype.

A Robot Easter Basket design that was too costly to make

This particular design came out very well as a  prototype, but unfortunately the design's cost caused it to be too expensive to make for the retail market. This is the part that many people do not realize about designing products: Not only does the product need to look and fell good, but you are limited to what you can design because of pricing.
This becomes even more of a challenge in a bad economy.

The original concept design including text directions on the design.

In a bad economy, retail prices tend to stay the same or go lower. But the cost of labor, material goods and shipping do not stay the same. So what most retailers do during bad times? They find cheaper alternative/substitute solutions -- without giving up too much quality to the product.

Personally, when I design, I think of things I would have enjoyed as a child. I still want to see this being sold in retail stores one day. Maybe if/when the economy gets better . . .

Thursday, June 20, 2013

Daily Quick Sketch: Laughing Dog

This is an old image I used for several projects.
Originally it was the cover illustration of a greeting card. It has since gone on to be used for a pet toy website logo and part of a design for a European nursery rhyme book (Hey Diddle Diddle)


Recently I inked the image for printing, replacing the shading with lines. I kept the pen work very loose to give a playful feel to the overall image.

Image redrawn with ink lines (for printing)

Saturday, June 15, 2013

Drawing Process: Bobby's Biggest Bubble

I've recently had quite a few people asking about how I did the artwork for my children's book Bobby's Biggest Bubble. I'll try to explain my process below:

I used a great small (and inexpensive) program called ArtRage Pro to do my line work and coloring. My story was very whimsical and funny, so I wanted the book to have a Saturday morning cartoon style, using solid black outlines and vibrant flat "cel"-like coloring.

The finalized kitchen scene from a page of Bobby's Biggest Bubble (sans type/lettering)

I found ArtRage Pro was the best program for the line control I needed. (Other more popular programs, like Photoshop and Painter, just didn't have that feel or line control I wanted.) Using the program's default "Round and Smooth" ink pen setting and adjusting it's Smoothing setting to about 40-50% gave me just enough control while keeping the line smooth and clean.

The image was first pencil sketched, scanned and then placed into ArtRage where I traced in the ink lines (using about 9% pen size).

The original pencil sketch scanned into ArtRage Pro to be inked and colored

Each element (e.g. kitchen background, the bubble) and character were drawn on separate layers, allowing composition/size adjustments.
The "inked" layers all seen together without coloring. Note: many background items were extended in more detail from the original pencil sketch. Doing this allows more control of placement and making adjustments if needed.

For coloring, I used the Watercolor setting of Wet on Dry to get the solid color fills.
I created separate layers for 
highlights and shades and placed their layers over the color layers. Then I drew in the highlights and shadows using the same smooth Ink Pen as before, only at a much larger size (about 15%). For shading, the layer's Opacity was turned down to 15-20% using black as the color. For highlights, the layer's Opacity was turned down to about 60% using white as the color.
Lowering the opacity creates a transparent coloring control that allows me to darken or lighten the colors underneath.

The image shown w/o highlights/shading, but includes the word balloon and outer framing (via Photoshop)

When the image was finished, it was exported to a Photoshop PSD file (with layers) so that I could compile and convert all images (and layers) into a high quality TIF files and place them into Adobe's InDesign for publishing. Final touches like text, word balloons and outline frames were done in Photoshop.

FYI: I plan to use ArtRage again for the book's sequel . . . love using this program!
Tuesday, January 29, 2013

Greeting Card Market

Before making a career in toy design, I tried my hand at many things: comic strips, magazine cartoons, children's books and greeting cards. Submitting to Greeting Card companies was just as difficult as submitting to the children's book publishers. (Maybe even harder, since many greeting card companies started to hire in-house artists - which meant you needed to live reasonably nearby the company.) It also wasn't a great paying job.  You didn't get to keep your work, the company had full ownership and you would have to constantly churn out new materials daily to stay competitive. I knew all of this, but still decided to give it a try.

Below is one of the few card designs I still have on record, mostly because it is was a favorite of mine. Seeing it now, it really doesn't work for the general public's sense of humor, especially for Christmas. But I still think it's a great funny card (. . . for those with a warped sense of humor.)


Tuesday, January 22, 2013

The Importance of the Re-Write!: Intro

RE: Bobby's Biggest Bubble and its Re-Writes
Before finally printing my first book last year, I gathered all the past information and images I could find. Some things were lost due to a broken hard drive or merely misplacing a file or two. But most of the material was archived on several backup drives.


Somethings didn't change that much at all. The original cover from the B+W dummy book .

Since the book's first version was made nearly 19 years ago, the story itself has gone through quite a few major revisions over the years. I found one of the original dummy books that I tried to get published nearly a decade ago (this, in particular, was made during my second attempt of breaking into the publishing business.) All of the following images for this posting will be from this black & white mock-up book.

Just to Note: It's safe to say that I HATE seeing my old work. 
I see so many poor decisions in the storytelling from looking at these old alternative versions of Bobby's Biggest Bubble. The main elements are all there: the gumballs, the big bubble, the meteor and of course Bobby. But much of the story's flow and structure has been tweaked.


So . . . I'm going to share some of these alternative versions of the book here in 3 parts this week. Think of it as one of those DVD extras where the clips that were edited out.
These postings will assume many have read the story - and if you haven't, there will be spoilers (so don't spoil it for the children!)

Part One will be about the arrival of the gumballs and the neighborhood children.

Part Two will look at Otter and how the bubble was originally going to get around town.

Part Three will show the not so great original rushed ending. (sigh)

You know, I'm starting to think I shouldn't show this stuff. But hopefully, in doing so, others can see how important rewriting a story really is when trying to craft a better story.

Sunday, November 4, 2012

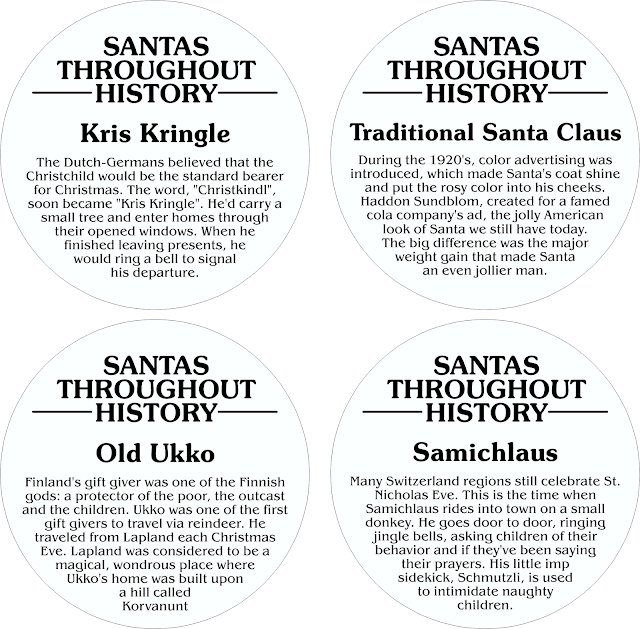
Favorite Past Projects: Santas Throughout History

{Slowly things are getting back to normal here since the storm Sandy hit our area hard last week.  There is concern that a nor'easter storm is now on the way. . .}

This was a project that I really enjoyed researching back in the 90's.
The prior year, I had made a successful line of plush Santas from around the world, dressing Santas up in their native garb. So the following year, I thought of creating a new line of plush Santas throughout history. Looking into all the origins and connections of Santa was a major task and amazing, especially when you can find so many traditions that were adapted and revised from so many other countries. (And not all of them were connected to Christmas.)


CUSTOM HANG TAGS: This project was to create a set of plush Santas Claus toys, each based of variations of Santa Claus legends throughout history.

Below are the backsides of the custom hang tags; each were to be short factoids about the different versions of Santa Claus throughout history. 


Monday, October 8, 2012

Bobby's Biggest Bubble: Now available online

Bobby's Biggest Bubble in now available online for purchase at Etsy and eBay!
There will be more marketing locations added in the coming months, but for now I need to control the amount of books being sold until I receive the bulk of my shipment in a few weeks.


Update:
eBay, Etsy, and other online book outlets are no longer linked to the book.
This is mostly due to cost and maintaining inventory.
You can still purchase the book via Paypal (at the lowest price with free shipping.) and with Amazon (which costs more because Amazon wants a larger cut of the sale.)


Tuesday, October 2, 2012

Bobby's Biggest Bubble: 1st Shipment of the Books have Arrived!

Books are in, and they look great!
Mailing out to KickStarters begins Thursday Oct, 4th.
New orders for the book will available in a few weeks in the middle of October; I'll be sure to provide links to where the book will be sold.

First shipment arrives and looks fantastic

Closer look at the bookmarkers

Showing the white bubble wrapped packet and it's contents going out to KickStarters

WOOT!

Sunday, September 9, 2012

The Ol' Gum Promotional Gimmick

Talking to my cousin Cindy about Bobby's Biggest Bubble, she mentioned that maybe I should consider sending gum when trying to promote the book. Funny thing is, I did try something like that long ago at my first attempt to get the book published.

So I did a quick search on my archive drives. There, among the many archived files of rejection letters, I found the old gum wrapper design used to promote the book. I would send the redesigned gum packs with my dummy book submissions to various publishers.


The plan was simple:
  • Buy several packets of Trident gum. 
  • Measure the size of the gum packs. 
  • Redesign a wrapper that featured Bobby and promote the book.
  • Print the wrapper on high gloss film.
  • Remove the Trident wrapper.
  • Use double sided tape to attach new wrapper design around the trident gum.
It looked really good, but apparently it didn't work.

To be honest, I don't think many of the publishers I submitted to even looked at my book. In fact, I know several publishers never even cracked open the book's cover, because I placed very tiny seals on the edge of the books. When those books were returned - those seals weren't broken.

This is still a good idea.
I think I'll update the artwork and info and try this again.

Saturday, September 8, 2012

Bobby's Biggest Bubble: Off to the Presses

After so many months/weekends working on the book, it's finally out to the printer.
WOOT!

In celebrating, I thought I'd post one of my favorite images from the book:

One of the many things Bobby does with his bubblegum winnings.

Below is the final dust jacket artwork that was sent today: 
Pictured above is the full length of the dust jacket wrap. (Plus Note: the book price was reduced down to $15.)

And below is a sample of the inner lining of the book:
Pencil sketches line the inside of the front and back of the book.

Monday, September 3, 2012

Final Stretch


Well, for the holiday weekend, I've been at the computer non-stop doing final changes and corrections to the book. Still a way to go . . . keep finding small things that need changes. Being my first book, I'm constantly worried about the layout, especially with the cover and dust cover artwork. This is where all the Algebra from high school finally comes into play. Figuring out where to place the artwork while measuring the surface distance that is created by the spine of the book, (which is figured out by the thickness of the paper and the amount of pages) - I'm sure figuring this all out gets easier with experience . . . but right now -- I'm FREAKIN' OUT! (hehe)

Here's the finalized dust cover wrap - seen below. I'm giving the inner flaps about 3.5" inches inside (hope that's enough to keep the dust cover attached to the book while reading.)


The final price has been reduce from $18 to $15, figuring this will help get the book out to more people. I will also have a free shipping code which will keep the final price to $15 per book.


Well, back to work . . .

Thursday, July 19, 2012

Design Process for Company Logo (Part3)

6. Fine tuning 

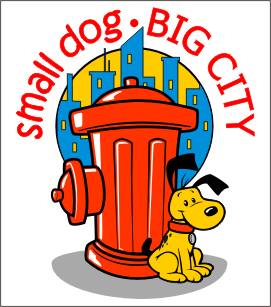
The client had liked the direction the logo was heading and decided the highlighted hydrant with the dog hugging was the best, but she didn't want the dog hugging the hydrant. Instead, she wanted the dog facing forward -- so two more versions were created.

Her choice was to go with the left version with the sitting dog, but she also liked the blue spot background of the right design. She also liked the more rigid typeface the word "BIG CITY" was using in the 2nd image. Her last request was to try and give the dog a little more character.  


7. Print-out Variants 

The follow-up was the sheet below, showing the key design in 3 different printing formats for her to print in many mediums. Also included is an image showing several more design elements like adding spots to the dog, a blue cityscape to the background and changing the typeface of the words "BIG CITY".

To make sure that this was the image the client wanted, I created one more sheet of variations. The goal here was to throw many different colors, size alterations and detail changes to make sure that the client was going to stay with her final choice.

8. Approval 

The client was happy with the new element changes -- all but the spot around the dog's eye (which did seem a bit too much). Below is the logo that was given approval.

Unfortunately, like many websites after 9-11, the site never took off that year. I know from my current job that the pet business has been starting to grow again, particularly in the clothing for smaller dogs. I think this website's concept could do very well today - even in a bad economy.

I hope you enjoyed this step-by-step process.
My advice to new designers: be patient with your client and listen to what they say. If you don't agree with the client, try to explain your concept with logic - but always allow the customer to have the last word. Lastly, when designing logos, make sure you simplify as much as possible. The most famous logos are usually the most simplistic; so don't over color, over-shadow or use multiple colors gradients when trying to make a strong logo.

Keep it simple and clean.

Design Process for Company Logo (Part2)

continued . . .

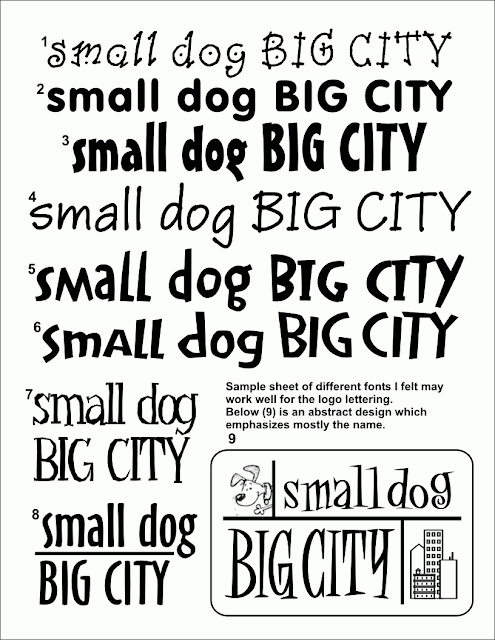
4. Revision (Typeface Logo)


I could sense the client was starting to have doubts about the direction of the design.
So trying to keep the design process moving, I put aside the graphics and focused on typefaces for the logo. Allowing her to see her company name in various typefaces could inspire a better direction. The focus here was to keep "small dog" in lower case and "BIG CITY" in upper case lettering. She really liked that concept for the typeface.


5. Revision (Graphics)


The next few days talking with her, I tried to convince her that the hydrant concept, (my personal favorite) was the stronger design in my opinion. At first she was negative of having a fire hydrant, something dogs urinate on, be the focal point to her company logo.
I tried to point out that a fire hydrant is one of the most popular icons (next to a bone) that you could have for representing dogs. But to me, not only does a red fire hydrant represent dogs - but also cities and urban communities. She liked that angle . . . so I began creating variations to the hydrant/dog theme.


After sending her the Hydrant theme samples, her response was now excited; She now felt like the direction was exactly what she wanted.

More to follow . . . 


Wednesday, July 18, 2012

Design Process for Company Logo (Part1)

The next few posts will be dedicated to showing a sample of my design process for making a company logo.


According to my records, this work was done in 2001, a little over a month after 9-11. The contract was to create a new logo/mascot for a new website. The site's goal was to sell pet items for tiny dogs that lived in larger cities like New York City. The entire process took 1 month to complete. This is not the full record of the work, but I'll try to focus on the main points and show the development as the project moved along.


1: Character Development 


I asked the client what type of dog she wanted to represent her company. She wanted it to be instantly recognizable as a dog - so this eliminated any exotic featured small dogs like a chihuahua whose features may not be immediately seen as a cartoon dog. It was agreed that a beagle Snoopy-like dog would work best.
I sent her several sketches of cartoon dogs, from various levels of comically exaggerated features -- to a very toned down character.


Her response was that she wanted fewer details to the dog. The character should be very minimal in design - yet unique enough not to be confused with any other dog character.

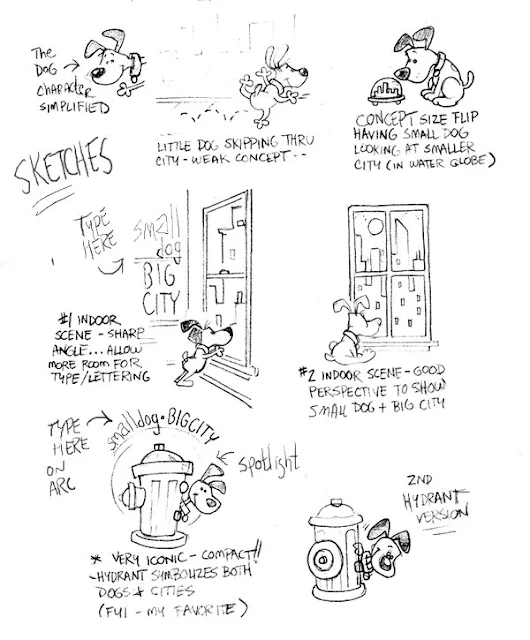
2: Concept Sketches 

I then sent a page of rough concept sketches showing the simplified dog character doing various things related to cities. She liked the idea of seeing a city outside the window. She favored the version with the side view of the dog - wanting to see his face.


3: Color Comps 

The following images were tightening up and colored including a couple of font/logos.


She felt the dog looked too rigid and angular. She was also starting to feel that maybe this wasn't the look she wanted. I sent her these follow-up colored comps making small adjustments and softening the dog a bit.


More of the design process to follow tomorrow.

Sunday, June 17, 2012

Pool Wrap


Below is part of a plastic pool wrap I made this year for the Euro-Asian market. I kept it very clean and graphic, minimum highlights and heavy with cool colors.