Showing posts with label Product Design. Show all posts

Saturday, August 4, 2018

Throwback Thursday: Golf Dad Mug Design

REPOST DUE TO SO CORRUPT AND/OR LOST IMAGE FILE WITH BLOGGER:
Originally posted on 2/4/16


This one goes back many years ago when I worked for a giftware company designing novelty products. They wanted a humorous Father's Day mug related to golf. I wrote as many insults and oddities about a typical Dad playing golf.


The mug sold well on the market, so someone asked me to create 3 more for the following year. I remember the three follow-up mugs were, Fisherman, BBQ Chef and Couch Potato -- but this original Golf mug outsold the other mugs combined.

One thing I remember while creating this design was that I did a spotless vector version, which looked very polished with solid clean lines. But this rough and loose style seemed to work much better with the text humor.

Tuesday, October 17, 2017

Character Designs for a Game: Part Four, The Minotaur

Here's the final design of the four characters I made for Steve Radabaugh's game, Dungeon Marauders: The Minotaur.
The final colored design of the Minotaur submitted for Dungeon Marauders
Of the four designs, the Minotaur was the one that needed the most changes. When I first did rough sketches, I was looking for the Minotaur to be different than the typical version we all know. So I made its face more beastly; like the main character from "Beauty and the Beast". And again, like the Ogre, I wanted to play around with a very top-heavy character with tiny legs. I sent the roughs to Steve for comments.

Quick concept pencil rough sketches of the Minotaur -- Trying to get a new look

This is where an outside critique really helps. As the designer who is constantly looking at the work, you sometimes lose focus and the perception of how others see your work. I didn't see what was wrong until Steve pointed it out. 

Tightened pencil sketch of the Minotaur which was off target . . . 

Steve felt that the sketch was off, especially around the face. While I was trying to be different, I was subconsciously omitting one of the most important features of a Minotaur . . . it's bull-like facial features.
 . . . The final pencil sketch with greatly improved Minotaur bullhead features!

Once the face was altered to be more bull-like . . . it seemed to all come together instantly. There was no question this was now a Minotaur!

The Minotaur design is seen with a drop shadow on a dark background
As Steve continues to develop his game, I hope to share his progress here with future posts about Dungeon Marauders.
Those interested can view the game's progress from his blog at 
www.radicalbomb.com
or look him up on Google+ at www.google.com/+SteveRadabaugh

Character Designs for a Game: Part Three, The Troll

Today's design is the Troll, which I have to admit is a complex creature because there are so many different versions in many world cultures. 
The full-color image on dark background with drop shadowing

Some are giants, while others are human size . . . Or they are long-haired, naked, googly-eyed imps as in the popular 70's dolls (which were re-popularized in the '90s.)
In D+D and fantasy games, they are often twice human size, slow-witted and regenerating menaces. Or, as in my Mother-in-Law's Icelandic traditions, they are 13 dwarf-looking brothers, who each take turns invading homes on the 13 days of Christmas. Some of the most annoying Trolls . . . are Internet Trolls. 

The many types of Trolls throughout the world
Some live under bridges, others live in the mountains, or as in World of Warcraft they are a dispersed race that has reggae accents. Some even turn into stone because they see sunlight.

But generally, there's one thing in common: they are ugly creatures.

Since this Troll is a role-playing game, I naturally had to focus on creating a more classic D+D gaming version . . . but keep it unique and original from all the others.
A few rough pencils sketches, which help me to explore, finding some unique (but recognizable) character features.
It was also important to keep this character different enough from the other 3 characters I was making for the game. As I previously mentioned, several of these creatures are interchangeable, where you may think a Troll might look more like an Ogre, Giant, or Orc than a Troll. Hopefully, with the main character features, props, and coloring, each of these designs will generally represent their legendary gaming creature.
The original pencil sketch of the Troll
Once I had the design cleaned and tightened, I decided to make a few color comps for the Troll's coloring using markers. The Troll was the only design of the four that I did a marker comp; I wanted to see how the coloring would affect the character. I gave Steve four color options, and again, he picked the same one I preferred . . . The yellow-green version.
Quick color comps I did with markers. Only one image was rendered on paper; then that was scanned into Photoshop, where the hues of the skin/hair were altered to create 3 more variations of color.

To help suggest the Troll's massive size, I gave him a heavy wooden club the size of a tree trunk.
The inked version of the Troll with his tree trunk sized club

 I still feel this character could easily play the part of an Orc, Ogre or Giant . . . But when comparing this to the other designs - hopefully, the traits of a Troll will be more apparent.

Character Designs for a Game: Part Two, The Ogre

Today's design is the Ogre, those big lazy bullies of the fantasy universe.
The full-color version of the Ogre on a dark background

I really wanted the Ogre to have a heavy-looking body -- yet make him appear strong and threatening. To add a little twist, I give him very tiny legs to hold that entire mass.

I think Ogres are better without too much gear, showing more flesh -- so I kept everything about this design very minimal. I focus on his body shape and bulkiness, giving him only a few shreds of clothing and an old battered sword that has seen better days. 

In the original sketch, sans sword, the Ogre appears taller.

The height was reduced to better fit the square area of the game card.
Just like the characters' sketches, I created several drawings of the weapons. These were then added to each of the character sketches in Photoshop. I find it easier to draw and design articles like this separately from the character. Designing items this way allows more focus to detail without having to worry about composition and balance.
The pencil sketches of weapons for each of the creatures
Also not wanting to make all the creatures in a tone of green, I gave Steve several color options for the Ogre. He picked the one I liked too . . . the flesh tone version. 
Take that Shrek . . . in your face!!

Several color options of the Ogre

Character Designs for a Game: Part One, The Goblin

Final image cleaned, slightly lightened and placed on transparent background

Awhile ago, during the holiday break, my friend Steve Radabaugh asked if I was interested in doing a few images for his upcoming Dungeon game. Since I've been trying to hone my work and do daily sketches of different characters each day - this was a perfect assignment. (Also, it's something I really enjoy doing - making monsters and creatures!) So over the weekends I started doodling to create some unique versions of classic creatures for his game.

Steve gave me a choice of many standard D+D creatures to pick from. I instantly wanted to do bulky and huge characters, since I thought I could have more fun giving them odd shapes and faces. I picked the Minotaur, Troll and Ogre. I also had to do the Goblin; just so many fun ways to draw these nasty little guys. 
Original pencil sketch of the Goblin sans his weapon
The thing I find interesting about Ogres, Trolls and Goblins is that they are very similar in many ways and are all portrayed in many unique styles and looks. Yet, I don't think there is an absolute definitive look of a Goblin, Ogre or Troll. If you Google each, you'll find very similar looks crossing between the three - where some images it can be any one of the three.) So my first challenge was to define what each one was to me.
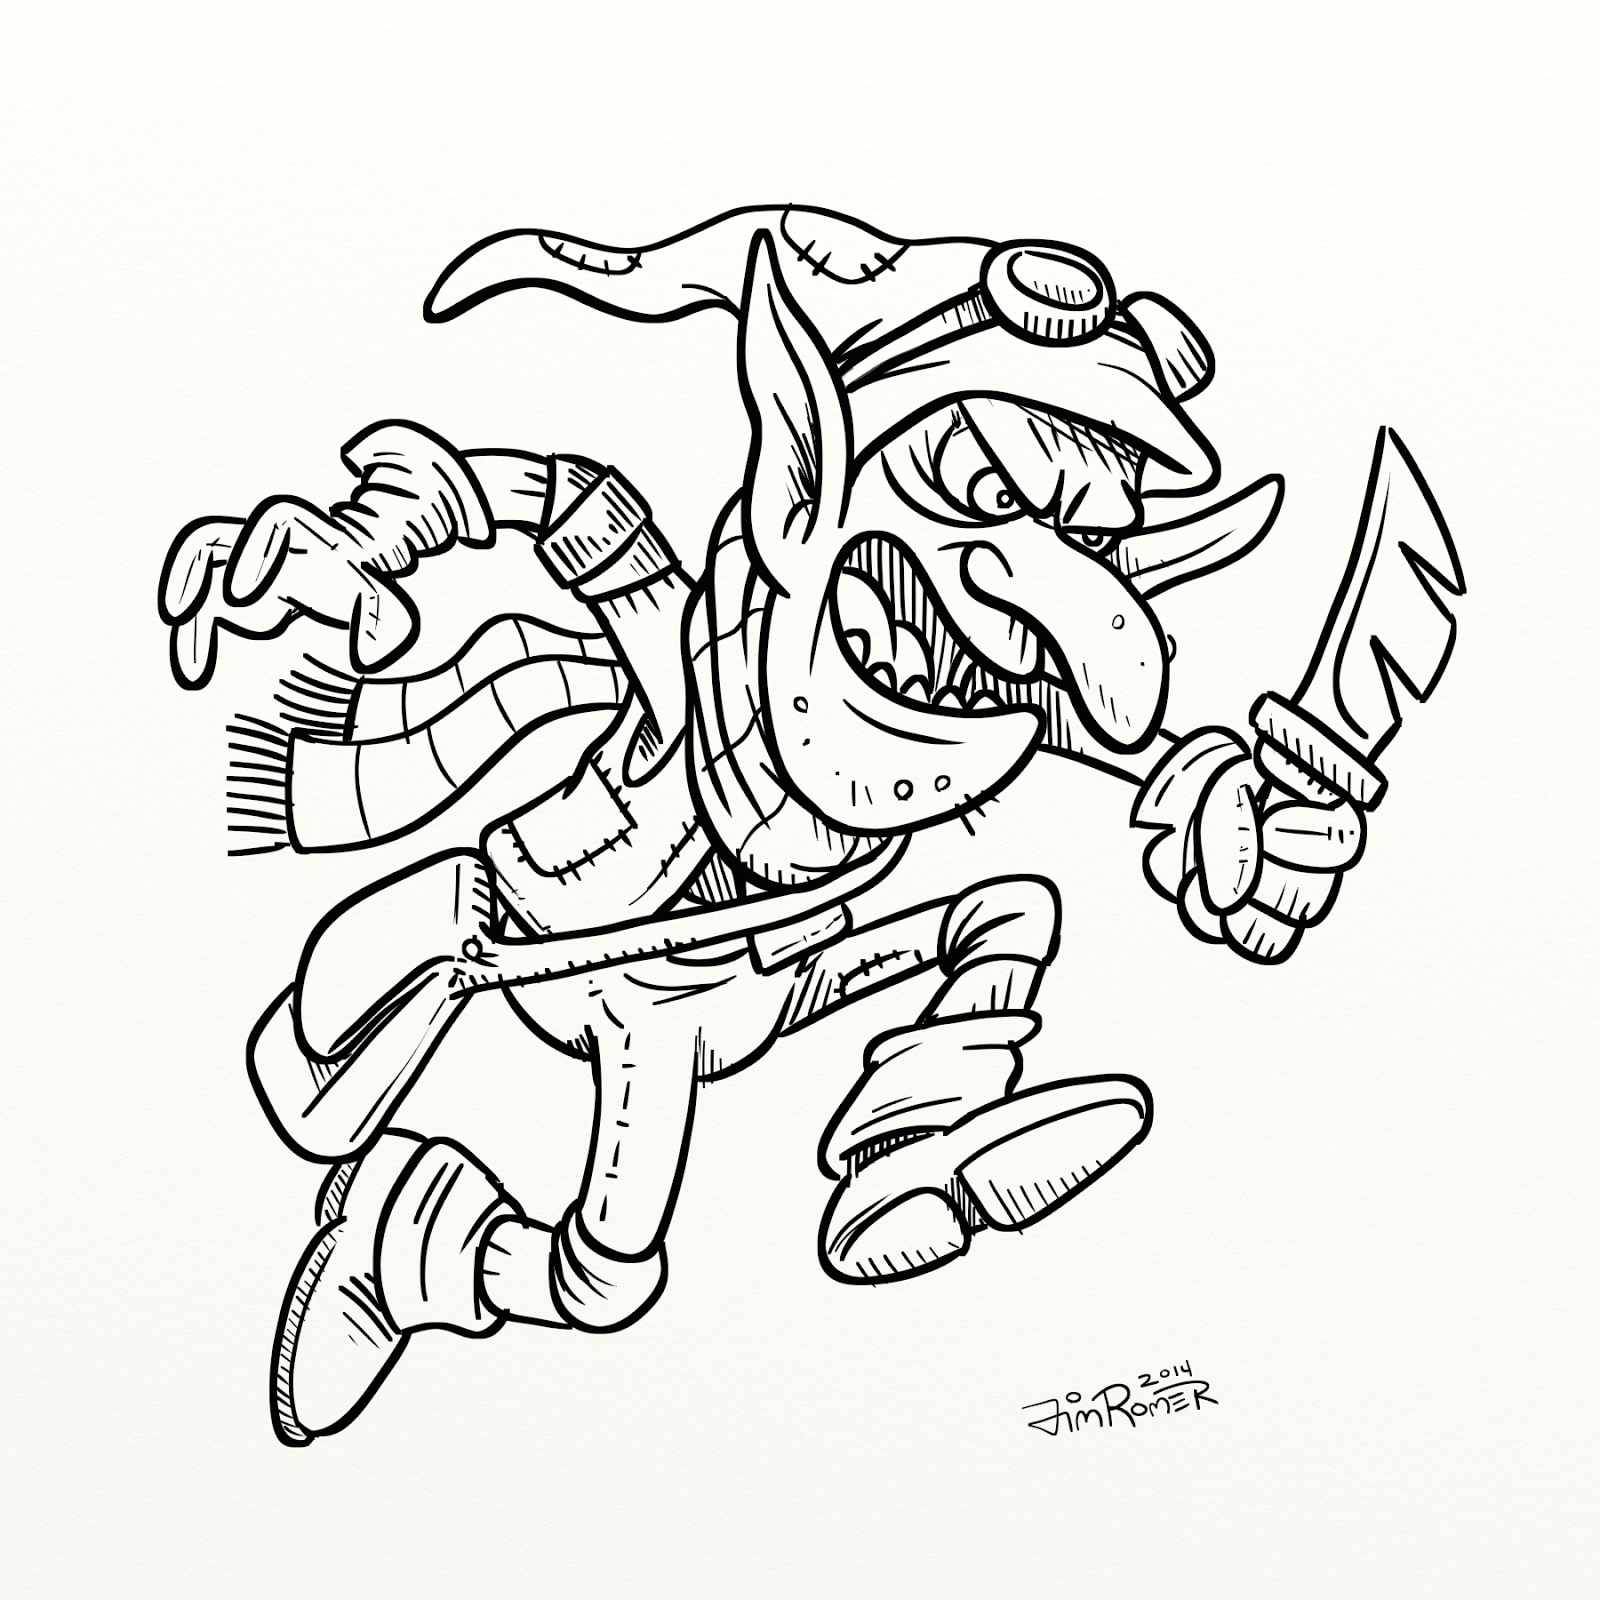
Inked version of the Goblin now seen with his weapon
The most obvious . . . there is a definite size difference between the three.
Also, Goblins tend to be smarter, Ogres not smart and Trolls tend to drool on everything.

Goblins seem to be more spry. They make, steal and use tools/gadgets.
So I thought my drawing of the goblin should seem more rogue-like.
Color version of the Goblin using a limited palette of colors for a more graphic look

I'll be posting more of this work during the week, showing each of the four characters.
Tomorrow, part two: The Ogre


Saturday, October 8, 2016

Illustration Friday: ICE (UPDATE)

Illustration Friday: Every Friday a word is given on the website, IllustrationFriday.com. Artists and illustrators then submit an image that represents that word all during the week.

This week's word: ICE
Wrap design made for inflatable swimming pool

Originally posted 

MONDAY, OCTOBER 15, 2012

This is a very busy week for me, so I had to pull from the archives.

This was a design I made recently for an inflatable swimming pool wrap (the image repeats several times around the pool.) I made this thinking how fun it would be seeing playful polar bears and penguins swimming around icebergs during a hot summer's day.

I kept the image very blue and cool, limiting warm colors to just a few highlighted small areas. The composite for this was very important to balance out the polar bears and penguins so that they seemed to mingle all together and not just hang within their own species. Hopefully, when looking at this image, kids get a friendly, fun and cool feeling.

The artwork is vector based so that the image could be enlarged, reduced or re-arranged to be used for other items like beach balls, beach umbrellas, swimmies and life preservers.


RE: Illustration Friday
If you would like to join in on the fun, head over to Illustration Friday. It's totally free, no need to login or sign up for anything. You can view all the submissions from this week (and past archives of previous words.) Have a sketch to show? Send your own artwork up for others to see.

UPDATE:

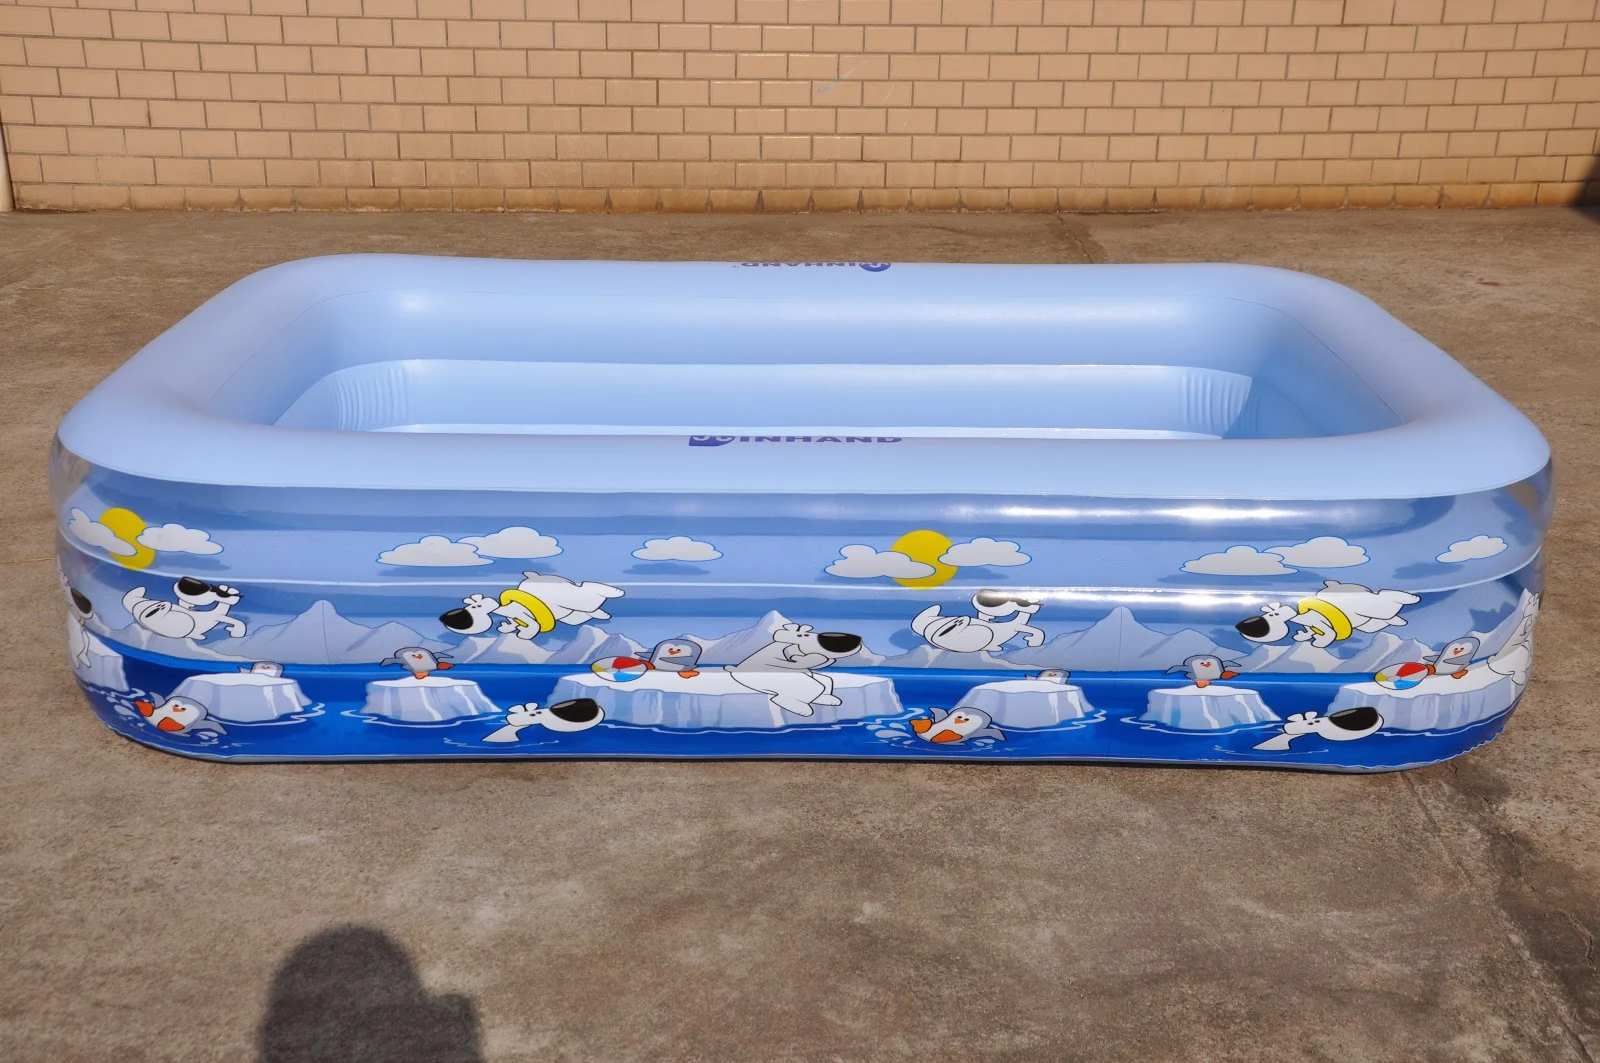
Below is an image of the finished product. The repeat turned out great. I like how the clouds cast shadows on the inner lining of the pool. This image was taken outside of the factory near Shanghai, China.

The one thing that bothers me is that the tube around the polar bear's waist should be red. I feel the yellow tube competes with the sun in the sky, but at least it's a warm color against all the cool coloring below. Don't know why that change was made.


Image of the finished product using a repeat pattern of the design above.

Tuesday, February 9, 2016

Follow-up: Using RedBubble.com

I mentioned in a previous post about using RedBubble.com and I wanted to follow-up on my experience using their custom product/printing service. I first tested them out by ordering a couple of t-shirts using some of my 2015 INKtober sketches: T.H.E. Walking Dead and Batman vs. Baseball. The shirts arrived in less than a week after the online order was made.

Image showing the high-quality T-Shirt printing
The quality of the t-shirts was excellent. Tight coverage and spot-on color. The shirts are very comfortable and light, great for spring and summer wear. (My only issue was that some of my designs had transparent backgrounds, so those parts of the images blended into the color of the t-shirt. This could make the print look muddy if a dark colored t-shirt is selected.)

Metal traveling coffee mug using my image "T.H.E. Walking Dead", created using RedBubble.com
Link to the T.H.E. Walking Dead product page CLICK HERE

After getting the T-shirts, I purchased 5 other items from Redbubble: pouch, travel mug and pillows. All of these items were very reasonably priced for the high-quality made-to-order products. It used to be, (not too long ago), you had to buy a costly minimum quantity to get this level of quality. 

A zipper pouch using my design "Ghostie Emojis" on RedBubble.com
Link to the Ghostie Emojis product page CLICK HERE

I've added several other designs in the past few months, which have already been selected by other people to create their own products. There is also cash back sent to the artist for each item being made using their artwork. It's not a HUGE amount . . . but still, it's nice to see others enjoying the artwork.
There are so many great gifts and self-promotional ideas that can be used with this service.
Imagine creating products using your child's artwork, creating a prototype sample of an idea or design or making personalized "inside joke" t-shirts for friends, etc.

I highly recommend Redbubble.com
They often have discount sales from 20%-30% off . . . sign-up to get email notifications when these sales happen. (I suggest only purchasing when there is a discount sale. Usually, their best discounts occur around holidays.)

To see all my designs available on RedBubble.com - go to: Arrrggghhh's Shop

Wednesday, February 11, 2015

One from the Archives: Toad & Troll Ad

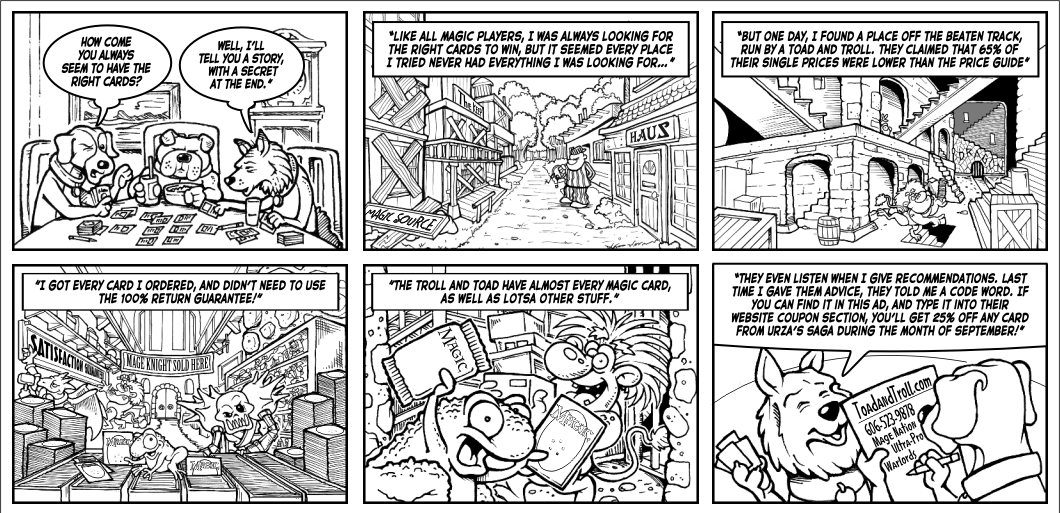
Pulling another image from the past. This one is from my freelance years. The files says it's save date was on Thursday August 9th, 2001.  I remember being very busy around that time and how all the freelance work went away after the 9-11 attacks.

Looking at this now, it really looks busy, especially without color to add depth. The directions I was given were very detailed and very type heavy. It was extremely difficult to squeeze everything they wanted into 6 panels. But I guess they were happy since they asked me to do several other designs for their company, including the new versions of their company mascots.

Comic strip style advertisement for the card game company Toad and Troll.

Toad and Troll still exist as a company, they're based in Corbin, KY.  Their website seems more streamline now, like an online store.  It doesn't have any of my artwork anymore, which makes sense since their website's "real estate" is better off showing products than promotional images/branding.


I had forgotten about working with them; that is until last year's New York Comic Con, where Toad and Troll had a booth adjacent to my brother's ChopShop table.
Small world, eh?

Sunday, February 8, 2015

Old Timey Baseball Mug Wrap

This one goes way back into my ol' Papel Freelance/Russ Berrie days where we designed novelty gifts. This design was created somewhere around 20 years ago for a Father's Day mug.

The work itself was done by first drawing four pen & ink illustrations. I had to do some old timey library searching for black & white photos to use for reference. Then I needed to create poses that worked well together to create a balanced composition, Once that was done, I took the image, reduced the size, flopped the film and created a repeating pattern in the background. Final stage, everything had to be rubber glued into place on a heavy press board.

Old Timey Father's Day mug design made with pen & ink and then step and repeat photos stats.

Today, this could easily be done on computer in a heartbeat. But back then, this job was tedious. I had to measure everything and figure the proper spacing for the repeating images in the background. As you can probably see, everything had to be hand cut using an Exacto knife.

I do remember that they liked the design so much, I was "awarded" by having to do another similar design with golfers.

Tuesday, January 20, 2015

First Business Card + Origin of Arrrggghhh Ink

I think one thing all artists, illustrators and designers can agree on, is that they hate looking at some of their early work. At least I feel that way about this item: my very first business card. It has so many errors and flaws -- it makes me cringe. Too many small details, too many motion lines and let's not talk about that font!

My first business card as a freelancer (can't believe people actually hired me!)

Looking back, I remember this image helping me decide on my company name, Arrrggghhh Ink. This card inspired me to make several other similar images. In all those versions, things were always going wrong with the characters screaming, "ARRRGGGHHH!"

This eventually led to things going wrong with pen ink; for example, ink spilling on a white horse getting zebra-striped ink stains along his back. (And instead of screaming "Arrrggghhh", the characters usually just cursed the ink.) Adding the word "Ink" to "Arrrggghhh" was a simple play on words so that, "Arrrggghhh Ink", when spoken would sound like an incorporated pirate company. (And of course there's the Ink/Inc pun . . . )

With so many characters cursing the spilled ink over the years, eventually the tipping ink bottle became my company icon.

An example how the spilling ink bottle became my company icon for Arrrggghhh Ink


My use of the word "Arrrggghhh" has been with me for decades. It was equally inspired by Charles Schultz's Peanuts (which was more Aaugh! than Argh!) and Monty Python's Holy Grail. As a kid, I always loved seeing different spellings of word ARGH in comic books. There was even a short lived comic by Marvel called Arrgh Comics!

When I started using computers, I created my I.D./handle as Arrrggghhh for bulletin boards, online services and I've been using it as my username in almost every online game I've played.


The latest version of the company logo, using the same elements, but cleaner and simplified

Looking back, was it the smartest name to use? Probably not.
People rarely ever spell the name right. Verbally telling someone my email address is often a task.Yet, people smile or laugh at the name when they see or hear it . . . that's why it's a great name. (I've even had several people snort with laughter on the phone; one time was with an IRS agent . . . really, some of them do have a sense of humor!)

People do remember the name - just not the spelling.

I can live with that . . .

Wednesday, October 29, 2014

Daily Quick Sketch: Frankenstein's Monster

Today's daily sketch is one based on the current design work I am doing for next year's Halloween products. I was looking for a way to make a more simplistic and iconic version of Frankenstein's Monster for a bag design. So I simply started by sketching a cartoon version of what I already visualized the character to be -- with one major difference: greatly elongating his forehead.

Quick daily sketch: digitally colored with thick brush settings in Photoshop

After sketching I laid in quick thick brush strokes of muted colors, trying to downplay the color saturation, making the image dark and gritty.

The final product design is based on this sketch -- but looks completely different and far more graphic and colorful. (Sorry, I can not show the actual artwork since the design is exclusively for the client.)

Hopefully if the buyer likes the design, we will see the bag in the stores next Halloween.
The original pencil sketch of my visual cartoon conception of Frankenstein's Monster

Saturday, October 4, 2014

Sunny the Snowman sketch

This was an old pencil sketch I had found recently. This was the front cover of a two fold hangtag for several plush Christmas toys selling at H.E. Butt grocery stores back in the early 90's. The plush toys came out great - made of mostly fleece materials.

Pencil sketch of a Christmas line I created for H.E. Butt stores

I know I have a sample of the finished printed tag somewhere; If I find it - I'll upload it into this post.

Sunday, September 28, 2014

Product Design: Side-by-Side technique

Today, I'm just going to post a little example of the "Side-by-Side" technique I use to help the factory create better looking products.I create a before and after image to show the changes needed to improve a product. This is usually done by taking a photo and altering it in PhotoShop.

Even the slightest changes make a complete difference in the final product. The photo below is the front view of a plush lion rocking chair. Notice with 4 simple changes how the lion seems more friendly and happy.

Side-by-Side comparison showing the before and after images of my Lion Rocking Chair design
(Sidenote: Sadly, the way work is done today, there is less time to do the fine tuning. This is mostly due to the short turn-around time schedules that many buyers demand.)

Tuesday, September 16, 2014

Product Designs: Pet Riders (PetSmart)

Few of my designs just arrived in the PetSmart stores for Halloween. These are just a couple of the Pet-Rider designs I have done over the past 5 years.

This is from the PetSmart.com website, showing my Cowboy Rider design that is on sale on for Halloween 

Packaging photo for the Cowboy Rider

We first made this type of pet costume for Target stores in 2009. They sold very well for four years, usually selling out. Since then, I've designed many versions: The Headless Horseman, Horse Jockey, Caveman on Dinosaur, Chef on Lobster and many, many more.

Packaging Photo for the Princess Rider

Below is a sampling of the artwork that is needed to print the faces for the riders.

Artwork for printing faces and details for the Pet Rider costumes' dolls.

Wednesday, April 30, 2014

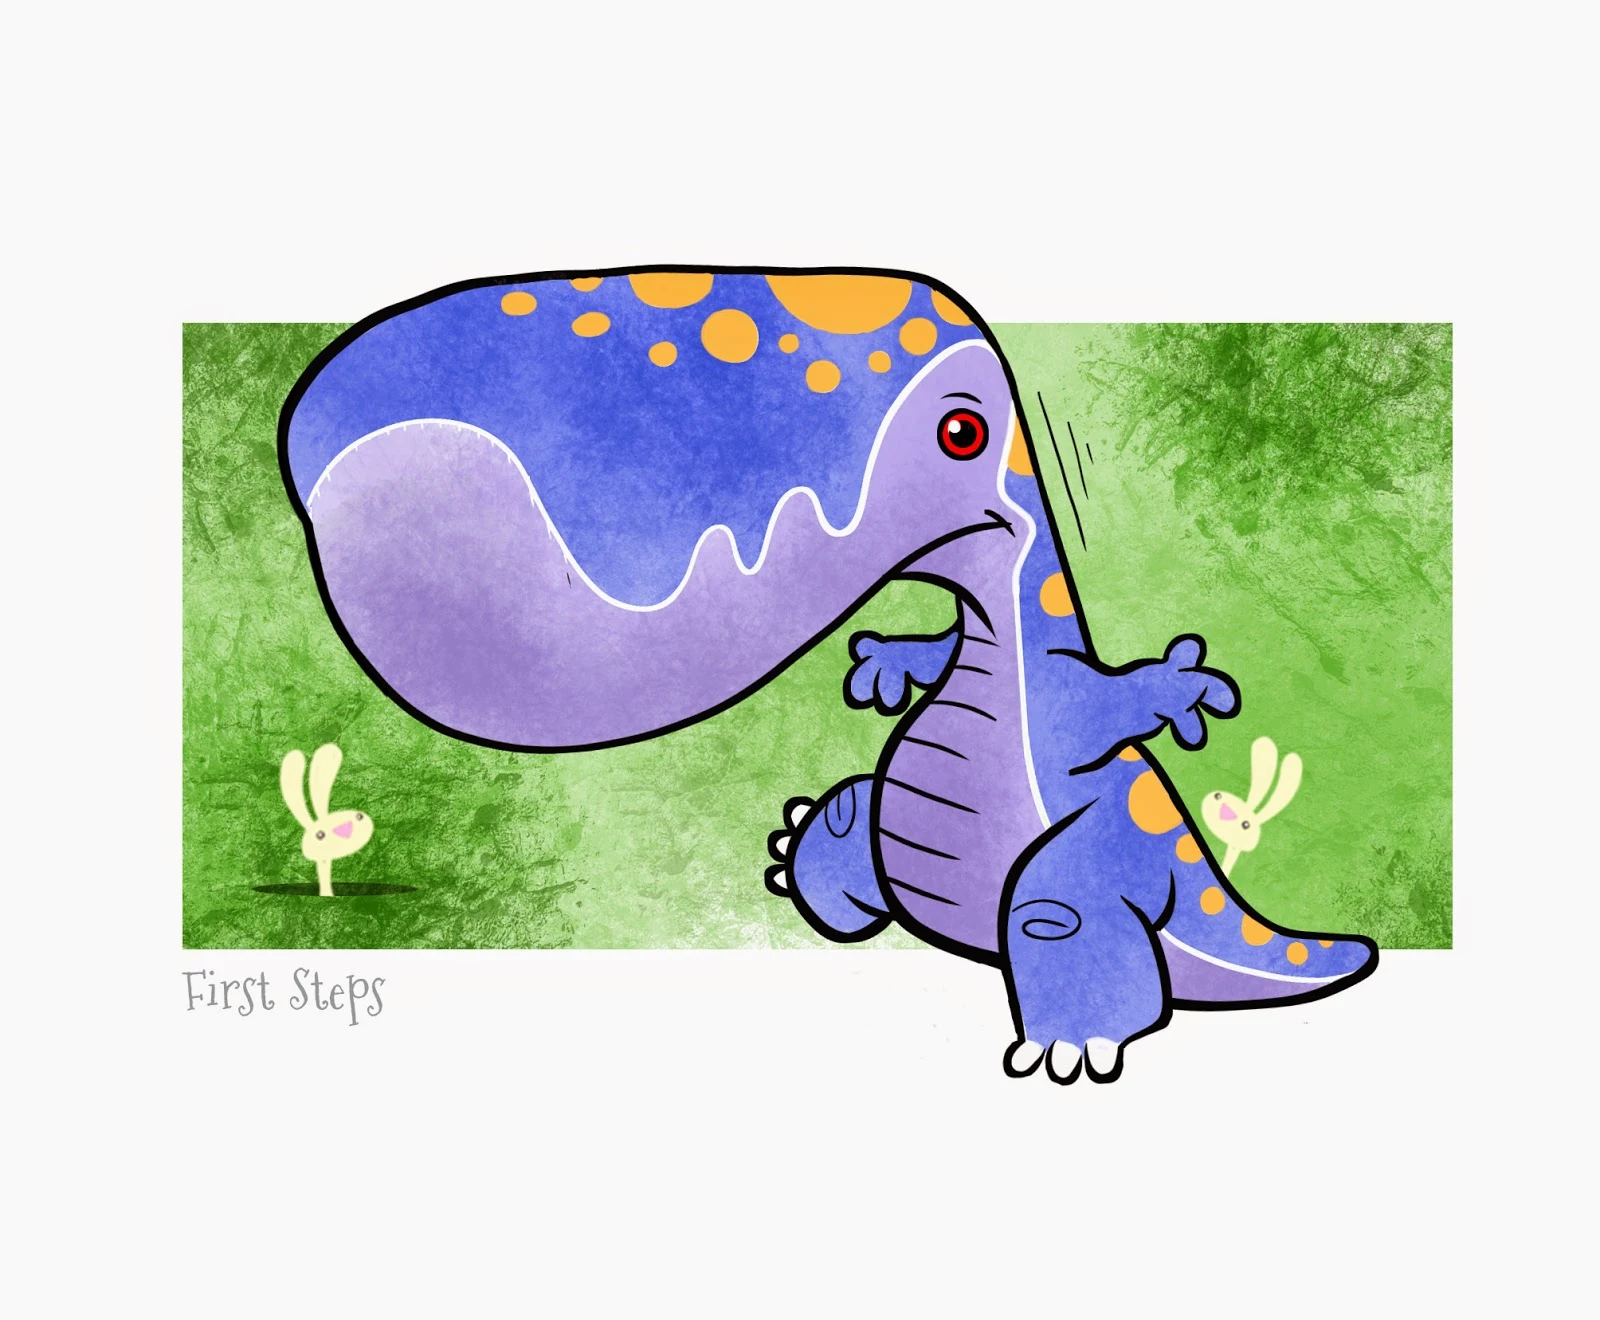
Monsters and Bunnies: First Steps

So for some time now, I've been sketching monsters with bunnies. There something about it that seems interesting to me.  Maybe it seeing the combination of the two "species" together -- how any monster seems to be cuter when in the presence of bunnies. (Go on try it, take the worst monster/killer/evil being and surround it with bunnies. Even if it's covered with blood - the bunnies make it cuter.)
"First Steps" • Part of a 6 image series of monsters with bunnies
This image was inked and colored using RagePro 4
Now, I'm not trying to create grime images, my cartooning style doesn't work like that. Plus, I believe there is a New Mom/Teen/College market for this style of images -- so of course I'm trying to make the monsters very cute even without the bunnies. 
Add those bunnies and the image just ups the cuteness level. 

Original pencils sketch of the baby dinosaur/monster
I plan to make a series of images/prints to sell. It'll take time for me to figure out pricing, material and how to best package. (I may want to soften the artwork and eliminate the black holding line too.)

I'll try to keep this projects's progress up to date here on the blog.


UPDATE:Illustration Friday: Every Friday a word is given on the website, IllustrationFriday.com. Artists and illustrators then submit an image that represents that word all during the week.This week's word: Vanity

Revamped version of "First Step" to "Vanitisaurus" for Illustration Friday's word "Vanity"
For this week's Illustration Friday, I made a variation of the image to work with the word: Vanity.


Tuesday, January 14, 2014

Production Designs: Plush Toy Concept Sketches

I found a disk containing many of the sketch designs I did while working for Nanco.
Most of these are well over 10 years old. Our New Jersey Amusement Plush Division of Nanco was the leader of Amusement Plush; those are the stuffed toys you see in all sizes; from crane machines to the gigantic "how-are-we-ever-going-to-get-this-into-the-car?!" sizes. 


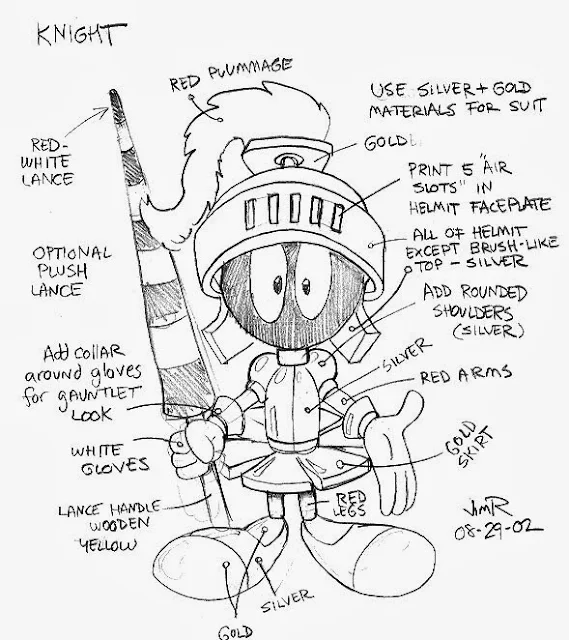
Warner Bros. Marvin the Martain designed as a Knight.
The challenge is to create a new look, while respecting the character and the brand

My job at Nanco was Creative Director, which meant creating designs, getting approvals from licensors, overseeing production overseas and acting as Art Director. Every sketch you see had to be approved by the licensor first, then go to the China factories for samples, usually in 3 to 9 different plush toy sizes. Then every size had to be approved, changed and re-sampled. So you can imagine the amount of work when we had 30-40 licenses, each with an average of 4-6 characters and each of those being done in 3 to 9 sizes. That's a lot of plush . . . 

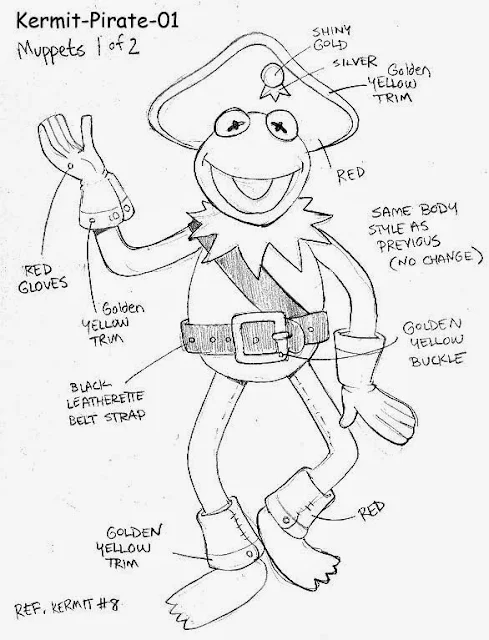
Kermit the Frog as a pirate. This was one of about 6 Muppet Pirate designs.
It's important to also consider the character's persona. Since Kermit is the leader of the Muppets,
it makes sense to make him a Pirate Captain and dress him as one.

Nanco had many licenses such as: Sesame Street, Jim Henson's Muppets, Warner Brothers, CareBears, Nickelodeon, Dreamworks, M+M's, My Little Pony, Simpsons, Family Guy . . . many, many more. First, for each licensed character, we had to create an original, fully approved, "master" plush pattern. Then each following year, we would create themes to freshen-up and dress-up the approved characters. Doing this helped sales since we were introducing new items to appear in the amusement parks each year. We had themes like Pirates, Circus, Birthday, Medieval, Beachwear and even Holiday themes like Christmas, Easter and Halloween.  

Vector color version concept design, Doing the sketch as a vector design allows quick color changes if needed.

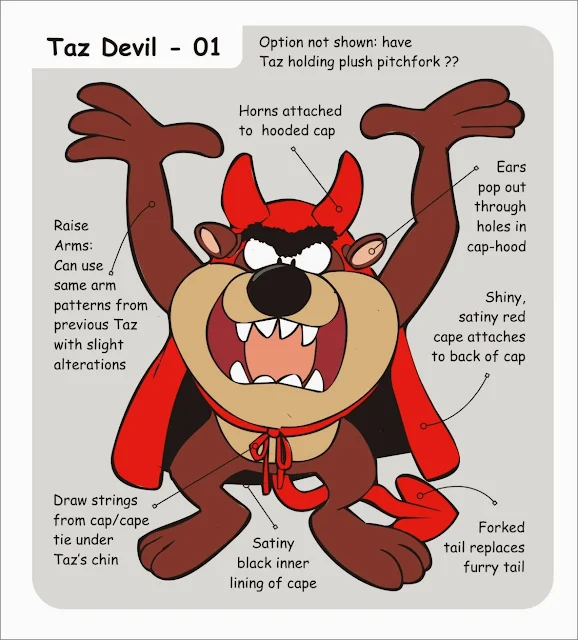
These are concept sketches. The concept sketches for plush toys were almost like doing fashion designs, only instead of fancy clothing, we were dressing the characters in cartoon theme related clothing. I would add notes and color call-outs to help the plush designers understand anything the pencil lines could
 not easily convey.

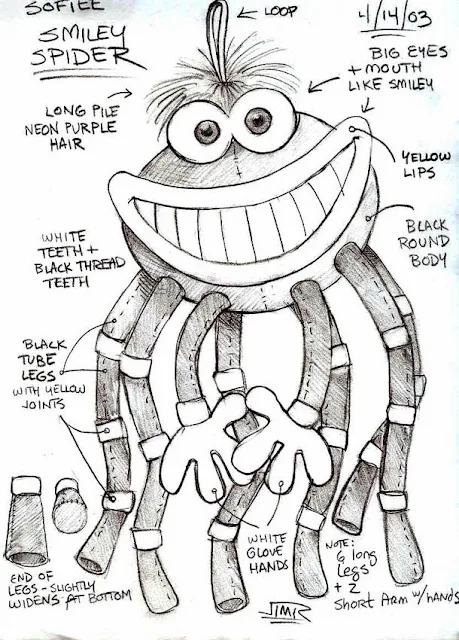
Original design Smiley Spider.
This was done as a follow-up to the very successful Smiley crab design I did the previous year;
but this design was too bulky and expensive to produce.

Occasionally, I would create original characters, (usually with a beach theme since some of our biggest buyers were from boardwalk amusement areas like the Jersey Shore.)  This character is one example that was a nice design, but it was just too costly to make.
One of the many things I learned as a plush designer is that a round ball-like head is more expensive to make because:
#1.) a ball takes a lot of stuffing to fill.
• More filling = more weight = more shipping cost.
#2.) Rounded shapes take up more room in a shipping carton -- adding a lot of wasted empty space. (Think of all the empty gaps of space between balls when they are stacked up.)
• Takes up more space = less items ship in a given carton = very expensive to sell.  


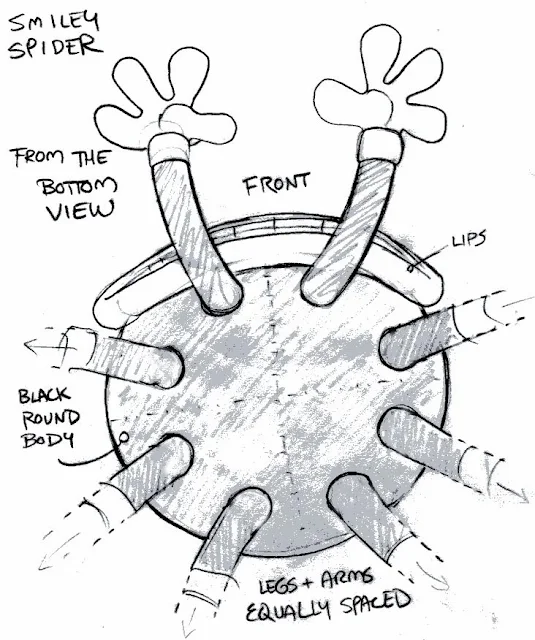
The underbelly of the Smiley Spider design. I felt I needed to show this angle of the toy so that the plush designers I Shanghai could see how I was imagining the character and it's ligaments.

In the future, I'll show more concept designs and licensor approval follow-ups (which I call side-by-sides)

Wednesday, October 30, 2013

Daily Quick Sketch: Scare D. Kattz

I've been working on Halloween designs and also just purchased a set of 24 color markers from Spectrum. Like Copic markers - these are alcohol based. Unlike Copic markers, these were 24 color markers for about $40. So, since Halloween is approaching, I did a black cat character to test out these new markers.
Scare D. Kattz
There is a quality difference with the Spectrum markers. The blend/bleed of their markers isn't as fluid as the Copic markers. The ink does blend, but they seem to go on dryer. Also, a big difference is that the Spectrum markers simply have a fine point end and a chiseled flat end; no brush point, which sacrifices a lot of control.

Comparing the high quality + costly Copic markers with the low-cost Spectrum markers
Note Copic's brush tip; this provides much more control for the ink and line 
I found if I color in small areas and also use a circular motion with the pen, I can fill an area evenly.  Not as easy as using a Copic marker - but doable. Then going over the area again, once it is dry, allows making layers of shading.  I still need time to really get the control of these pens, and while they aren't the best in the market, they are affordable and well worth using for color comps and sketching.

Comparing the Gelly Roll vs. SoufflÄ› white pens for highlights and touch-ups

UPDATE

After seeing many great artists using this white pen, I had to try Mitsubishi's White pen. By far a better quality white pen than the Gelly Roll 08. Major reason is the ink flow. Gelly Rolls eventually start to dry out at the tip and the flow of ink starts to clot. The Mitsubishi pen flows with ease. So, while Gelly Roll is a good white pen -- I recommend the Mitsubishi White pen (UM-153, available at jetpens.com).

Some example scribbling and signatures using the Mitsubishi White pen on a black surface


Also, I may have mentioned this before. For final highlighting and touch-ups, I use the Gelly Roll White #08 pen. This is a very impressive pen and the coverage of the white gel ink is fantastic. But be aware, the company also makes a similar looking white pen with another line of their pens called SoufflÄ›. These pens go on very wet and are not opaque at all. (I have a color set of these pens and have no idea what to use them for -- pretty worthless. Be warned!)